Challenge Progress !

As part of the BeagleBoneBlack Challenge set by Element14/Farnell it was requested/a requirement to post a blog update each week. We were informed of this a bit late so I pushed out a short update, then a longer proper ‘week 2’ update later.

I haven’t replicated these here, but you can have a link to week 1 ish and there’s also week 2 sometime this week there’ll be a week 3, then hopefully a push for the final blog post sometime next week on/before the 4th of July when the Challenge ends.

Posted in Events, Hackspace Land, LHS Events, LHS Publicity, Projects | Tagged , , , , , , | Leave a comment

RGB Backlit Arcade Buttons

*UPDATE*: Code available at https://github.com/pbrook/owled

A couple of months ago we acquired an arcade cabinet from the lovely people at HacMan (it was non-working and surplus to requirements). Since then Martyn has been working on replacing the screen with a flat panel, upgrading the buttons and generally trying to make it a useful addition to our hackspace.

The most recent change was the addition of backlighting to the buttons.

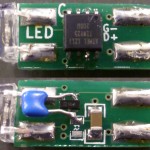
The buttons themselves use standard microswitches but have 2 extra spade terminals for backlighting – either by bulb or LED.  The problem is how to drive an RGB LED over only 2 connections. The solution devised by Paul is to fit an ATTiny into the space for the bulb. It’s powered through its data pins and communication is via pulses on this power supply, allowing PWM control of the RGB elements of the LED to give full colour and brightness control.

The LEDs are controlled by a Minimus 32 which also acts as a joystick interface to the PC in the arcade cabinet allowing easy configuration of the joysticks and buttons within MAME.

The first build is ugly, but functional.

Prototype

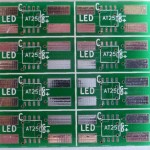
Once this was proven to work a proper PCB layout was developed and a batch of LEDs have been built for all the buttons in our machine.

PCB

Final Product

Here’s the end result (Once their addresses are set each LED will be individually addressable, allowing the buttons to be lit as indicators for the game in play):

RGB Arcade Buttons from Jon Stockill on Vimeo.

Posted in Projects, Uncategorized | 3 Comments

£1,000 for Beaglebone Black Challenge!

Edit: fixed Google Group link, oops.

The LeedsHackspace has entered a challenge against Pumping Station 1 thanks to Element14.

We have 4 weeks (less than actually due to various delays, etc.) to get a project going and win a vote on Facebook to get the prize. This is ideally using the device Beaglebone Black which is, effectively, a high spec Raspberry Pi with GPIO connections on it (so like a Raspberry Pi with a PiFace or Arduino integrated).

What’s the project we’ve chosen? If you want to get involved, post on the google group or in irc (room #leeds-hack-space) towards pbrook / stanto / nav.

Posted in LHS Events, LHS Publicity, Projects | Leave a comment

Diagnosing Laser Cutter Alignment Problems

I’m writing this because it appears we’re not the only ones to suffer from this problem, but there’s little information out there, and it initially had most people I asked completely baffled. Martin Raynsford suggested the problem was most likely more widespread than I thought and that it’d be really useful to get what I’d learned out there for the benefit of everyone else, so here we go.

We were suffering from strange variable power issues on the laser cutter. In some places it would cut with no problem at all, in other areas of the bed the power seemed to be far lower.

By adding a spot of tape to the mirrors on your laser you can see exactly where the beam is aligned by firing some test shots. You should start from the mirror closest to the laser tube and work out to the final mirror before the focusing lens. Out cutter showed the alignment was good right up to the final mirror when everything seemed to diverge. If you fire a test shot near each corner of the bed you should get something like this:
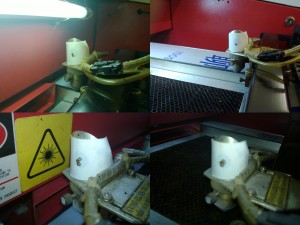
Laser Alignment Test Shots - One shot taken in each corner of the laser bed.

Taking a closer look at the end result we can see that 3 spots are clustered together and nicely central within the aperture in front of the final mirror, but the fourth is very low in comparison – this will lead to a reduction in the laser power at the front right of the bed:
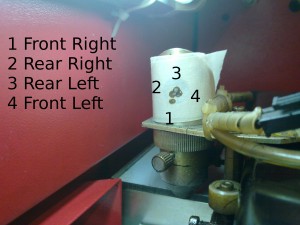
The results of the test shots.

Since everything runs on rails it’s not possible for the laser head to actually move up and down (in this case it’s too high, resulting in the low appearance of the spot) so what’s the cause of the change in alignment? It turns out the desk on which the laser sits has bowed slightly under the weight of the laser cutter resulting in a slight twist to the entire machine – so it’s not the laser head that’s high, it’s the entire front right corner of the machine.

The solution is surprisingly low tech – put a wedge under the appropriate foot to neutralise the twist, and re-check your alignment, you should find that things are improved, you may wish to experiment until you’ve got everything nice and square.

Maybe adjustable feet would be a useful lasecutter mod.

Hopefully this will save people hours of headscratching trying to diagnose similar problems. Happy laser cutting!

Posted in Kit | Tagged , , , | 15 Comments

An Introduction to (Hacking?) Electronics

While the Hackspace intends at some point to run workshops to help its members and possibly anyone else learn about making, hacking electronics and putting together circuitry (mainly with the Arduino, but not limited to) there’s a handy website out there that may help you to get on the right track.

Hardware Hacker” is a bountiful resource and collection of mini challenges to help teach you on the basics of electronics. Check it out if you’re struggling to get started reading that circuit diagram or if you have no clue where to start with your Arduino !

Posted in Blog | Tagged , , , | Leave a comment

AGM Postponed

Due to personal reasons with certain members the AGM has been postponed.

Posted in Events, LHS Events | Leave a comment

National Model Engineering and Modelling Exhibition 2013

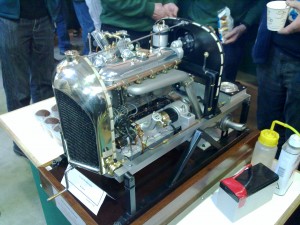
This weekend the national modelling and model engineering show is back to Harrogate. It’s a fantastic day out whether you’re after tools, materials or just inspiration for your next project. We’ll be paying a visit at some point over the weekend and I highly recommend you do too!

You can find all the details at http://www.theharrogateshow.com/

Posted in Uncategorized | Leave a comment

Sun Chime

Some time ago I presented my wife with a shop-bought wind chime and a promise that I could solarize it to make it ring whenever the sun came out. I’ve made these “sun chimes” before and in the depths of a British winter a cheery ringing to announce the sun is lovely. Its a nice project and (give or take a few months spent at the back of the workbench) – eventually turned out as planned.

At the heart of a sun chime is the solar engine – the circuit that takes a trickle of current from the small photovoltaic cell and stores it until there’s enough to kick a motor, which somehow sounds the chime. Solar engines are a staple of BEAM robotics btw and to find out much more see solarbotics.net for many variations. For this project I wanted to use a new engine I’d spotted which uses all discrete, common components. In fact it would be completely feasible to scavenge all the parts out of an old radio, VCR or most consumer electronics. The engine has its own write up: Instructables.com – The Easter Solar Engine. The unique feature of this design is the diode chain; you can tweak the optimum trigger voltage for the motor and load by simply adding or taking away diodes. Picking the main storage capacitor is a balance between how often and long you want the ringer to ring, and how much space you can afford for those bulky electrolitics.

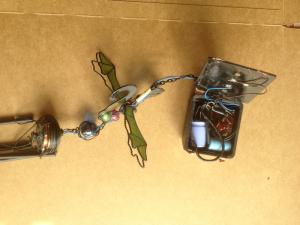
Inside the sun cime

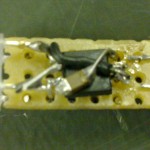
Here’s what I ended up with. Its all jammed on a little bit of perf board with the capacitors taken off the board to give me options for getting it into a tidy enclosure.
I had originally planned to connect the motor up in some way to shake the whole chime to produce the ringing. But this turned out to be a much bigger load for the motor and would have meant either using more solar cells or a stack of capacitors with only a very occasional ring. After fiddling around some more (actually, I put it on the shelf for several months), I finally hit upon tucking the motor into the little wire dome that tops the actual chimes, and driving the ringer directly from the motor itself. This avoids a lot of power loss from friction and its much simpler mechanically – I just suspended the clapper on a scrap of plastic, offset from center and attached that to the motor shaft.

The motor mounted in the chime

To finish it, a small power adapter donated the enclosure for the solar engine – letting me mount the PV cell on the back and clamp the whole thing on the chain which the chime hangs from. I ran the wire from the engine to the motor by weaving it through the chain so its reasonably tidy.
Our kitchen window faces pretty much due south; once in real, direct sunshine the thing was ringing itself crazy. (I had been testing with a 150W halogen light.) I reduced the area of the cell with some tape to get it down to a happy level. Its been up there for a few months now. On a bright but cloudy day it might ring once every 10 or 15 minutes, on a sunny day every minute or so. Because I installed the cell on the vertical, it works best in winter when the sun is low.
Maybe its just me, but creating something joyful that goes on working without needing any further care and feeding – no batteries, no external power – is extremely satisfying. This project is a fun thing to build and its possible to put together extremely cheaply (free even if you can find a solar lawn light to scavenge the PV cell from). Try it, you might like it.
Posted in Projects, Uncategorized | Leave a comment

Happy Birth..day? to… us? Okay that’ll do!

Whether it’s of the Leeds Hackspace or just since we moved into our current location off Mabgate Green, it’s been almost a year (a year this Saturday so I’m told!) since we moved into the new space!

There aren’t any certified celebratory plans as of yet but word has been mentioned that hangovers will be slept off during the bus trip down to EMFCamp the following day, by those who’re going!

There (may) be cake, ale, pizza, ale, possibly cider, if someone’s done a costco run, you can bring your own and just hang out with everyone on Saturday the 4th (this weekend!) The site should say when someone’s about as per usual if you’re a member and don’t have your own keys.

[ And stick the 21st in your calendar for our AGM :) -ed, Fligg]

Posted in Blog, Events, LHS Events, LHS Update | 1 Comment

Join the Leeds Hackspace Robot Army

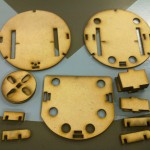
ShrimpBot Parts

The picture on the right is a kit of parts for a ShrimpBot, a small low cost robot that could be your ideal introduction to the world of robotics – your very own robot! We’re considering running a workshop later in the year where we’ll be building ShrimpBots, but in order to ensure we have the right number of kits available we need some idea of how many kits to produce.

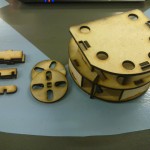
Assembled ShrimpBot frame

So, if you’d like to join the Leeds Hackspace Robot Army and be commander of all the desk you survey then leave us a comment here and we’ll make sure we produce enough kits!

We’re hoping a basic kit will be around £20, but it’s a flexible little beast so you can expand it with all manner of inputs and outputs as there are plenty of spare pins available, so you could outfit yours with a selection of sensors for detecting obstacles, following lines, or reacting to noises.

So, sign up now!

YOUR HACKSPACE NEEDS YOU!

ShrimpBot1 from Jon Stockill on Vimeo.

Posted in Events, LHS Events | 6 Comments